
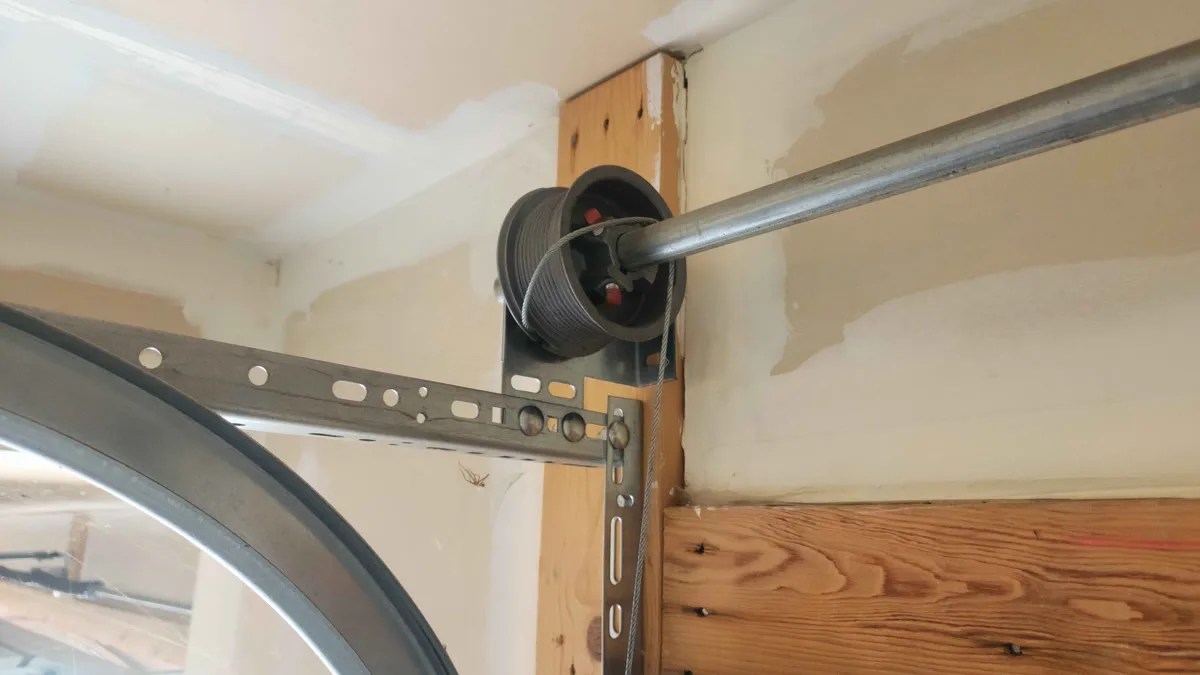
A garage door cable drum is a grooved spool mounted at each end of the torsion bar that winds and unwinds the lifting cables as your door opens and closes. When a cable drum fails – through cracked grooves, set screw slippage, or corrosion – your door may move unevenly, cables can jump off the drum, and the entire system becomes unsafe. Advanced Door, Utah’s #1 rated garage door company with 4.9 stars and 30,000+ reviews, provides same-day cable drum diagnosis and replacement across Logan, Ogden, Salt Lake City, Provo, Draper, Park City, and all of Utah. Call (844) 971-3667 for a free estimate – the only company in Utah offering a lifetime warranty on parts and labor.
Last updated: August 2026
In This Guide
- What Is a Garage Door Cable Drum?
- How Cable Drums Work With Your Spring System
- Cable Drum Types and Sizing
- 8 Signs Your Cable Drum Is Failing
- Quick Diagnostic: Symptoms and Likely Causes
- 7 Common Cable Drum Problems
- Cable Came Off the Drum: What to Do
- Professional Cable Drum Replacement Process
- Cable Drum Repair and Replacement Costs
- Repair vs. Replace: Making the Right Call
- DIY vs. Professional: Why Cable Drums Need a Pro
- How Utah’s Climate Affects Cable Drums
- Cable Drum Maintenance and Prevention
- 7 Common Mistakes Homeowners Make
- Frequently Asked Questions
What Is a Garage Door Cable Drum?
A garage door cable drum is a grooved metal spool that sits at each end of your torsion bar, directly above the door opening. One drum is mounted on the left side and one on the right. Each drum has a series of precisely machined grooves that guide the lifting cable as it winds and unwinds during door operation.
Think of cable drums like a fishing reel for your garage door. As the torsion springs unwind and rotate the torsion bar, the drums rotate with it, winding the cables and lifting the door. When the door closes, the drums unwind in the opposite direction, paying out cable in a controlled manner so the door descends evenly.
Cable drums are one of the most overlooked components in a garage door system. Most homeowners never think about them until something goes wrong. But when a drum fails, it creates cascading problems that can damage cables, springs, tracks, and even the door panels themselves.
Pro Tip
Cable drums are NOT the same as cable pulleys. Pulleys are used in extension spring systems at the back of horizontal tracks. Cable drums are part of torsion spring systems and mount directly on the torsion bar above the door. If you have extension springs (running along the horizontal tracks), you have pulleys instead of drums. See our torsion vs. extension spring comparison guide to identify which system your door uses.
How Cable Drums Work With Your Spring System
Understanding how cable drums fit into the bigger picture helps you recognize when they are the actual problem versus when another component is causing the symptom.
Here is the complete lifting sequence:
1. You press the opener button. The garage door opener motor engages, pulling the door upward via the trolley and arm connection.
2. The torsion springs assist. As the door begins to rise, the wound torsion springs release their stored energy by unwinding. This is what makes the door feel light – the springs counterbalance 90% or more of the door’s weight.
3. The torsion bar rotates. As the springs unwind, they rotate the torsion bar. The bar is a solid steel tube that spans the width of the door above the opening.
4. The cable drums wind the cables. Because the drums are fixed to the torsion bar with set screws, they rotate with it. As each drum rotates, it winds its cable, pulling the door upward from both sides simultaneously.
5. The door rises evenly. Because both drums are the same size and rotate at the same speed (they share the same bar), the door rises evenly on both sides. If one drum slips or has worn grooves, one side of the door rises faster than the other, creating a crooked or binding door.
When the door closes, the process reverses. The opener motor lowers the door, the cables unwind from the drums, the drums rotate the torsion bar, and the springs wind up again, storing energy for the next opening cycle.
Safety Warning
Cable drums are directly connected to the torsion spring system, which stores enormous amounts of energy. A standard two-car garage door weighs 150 to 250 pounds, and the springs exert hundreds of foot-pounds of torque. Never attempt to remove, adjust, or replace cable drums yourself. A drum that slips off a wound torsion bar can release stored energy violently. Always call a qualified technician. Call Advanced Door at (844) 971-3667 for safe, professional cable drum service.
The Critical Relationship Between Drums, Cables, and Springs
Cable drums, lifting cables, and torsion springs form an interconnected system. A failure in any one component directly affects the others:
- Worn drum grooves cause the cable to slip, jump, or fray, which leads to premature cable failure
- A frayed or stretched cable wraps unevenly on the drum, wearing grooves in the wrong pattern
- Incorrect spring tension puts too much or too little force on the drums, accelerating wear
- A slipping set screw allows the drum to rotate independently of the bar, throwing off the cable on one side
- Mismatched drums (different sizes left vs. right) cause uneven lifting and track binding
This is why experienced technicians always inspect drums, cables, and springs together. Replacing a cable without checking the drum grooves, for example, often means the new cable fails prematurely because the worn grooves damage it. For a complete overview of how all garage door components work together, see our guide to how a garage door works.
Cable Drum Types and Sizing
Not all cable drums are the same. The type and size of drum your door requires depends on the door’s height, weight, and lift configuration. Using the wrong drum is a common cause of cable problems and premature component failure.
Standard Lift Drums
Standard lift drums are the most common type in residential garage doors. They are designed for doors where the horizontal tracks are level with the top of the door opening. The vast majority of homes in Utah use standard lift drums.
Standard lift drums are sized by door height:
- 7-foot door: 4-inch diameter drum (most common in Utah homes)
- 8-foot door: 4-inch diameter drum with additional groove wraps
- 9-foot door: Larger diameter drum to accommodate extra cable length
- 10-foot door: Even larger drum for extended cable travel
The number of grooves on the drum corresponds to the number of cable wraps needed to fully lift the door. A 7-foot door needs fewer wraps than a 10-foot door, so the drums are designed with exactly the right number of grooves for each door height.
High Lift Drums
High lift drums are used when the horizontal tracks are mounted higher than normal, creating extra vertical track above the door opening. This configuration is common in Utah garages with high ceilings, particularly in newer construction and custom-built homes in areas like Park City, Alpine, and mountain communities.
High lift drums are larger in diameter than standard drums because the cable must travel a greater distance. The grooves are also spaced differently to accommodate the additional cable length required for the extended vertical travel.
Vertical Lift Drums
Vertical lift drums are used in commercial and industrial applications where the door travels straight up into the building rather than curving along horizontal tracks. You will find these on warehouse doors, loading docks, and some commercial buildings across Utah’s industrial corridors in West Valley City, Ogden, and the I-15 corridor.
Vertical lift drums are significantly larger than residential drums and handle much heavier cables rated for commercial-weight doors. For more on commercial door systems, see our commercial garage door repair guide.
Cable Drum Materials
Most residential cable drums are made from cast zinc, cast iron, or die-cast aluminum. Each material has different durability characteristics:
- Cast zinc: Most common in residential applications. Durable, corrosion-resistant, moderate cost
- Cast iron: Heavier, more durable. Used for heavier doors and commercial applications
- Die-cast aluminum: Lightweight but less durable. Found on some economy installations
- Steel: Used for high-cycle commercial drums. Most durable but most expensive
Utah Note
In areas near the Great Salt Lake (Tooele, West Valley City, Roy, Layton, Bountiful), salt aerosol corrosion can attack aluminum and cast zinc drums faster than in other parts of Utah. If you live within 30 miles of the lake, ask your technician about upgrading to higher-grade drums during your next spring or cable replacement. The incremental cost is minimal compared to premature failure.
8 Signs Your Cable Drum Is Failing
Cable drum failure rarely happens overnight. Most drums show warning signs for weeks or months before they fail completely. Catching these signs early can prevent more expensive damage to cables, springs, and door panels.
1. Door moves unevenly or appears crooked. This is the most common sign of cable drum trouble. If one drum’s set screw has loosened or one drum has worn grooves, one side of the door lifts faster or slower than the other. The door appears tilted or crooked during operation. See our crooked garage door troubleshooting guide for all possible causes.
2. Cable has come off the drum. If you see a loose cable hanging beside the door, it almost certainly jumped off the drum. While this can happen from a broken spring or cable issue, a worn or damaged drum is a frequent root cause. The cable loses its groove and unwinds chaotically.
3. Grinding or scraping noise from above the door. Worn drum grooves or a drum that has shifted on the torsion bar creates a metallic grinding sound as the cable tries to seat in damaged grooves. This is different from roller noise (which comes from the tracks) or opener noise (which comes from the motor unit). Our noise diagnosis guide covers every type of garage door noise.
4. Cable fraying at the drum. If your cable shows fraying, broken strands, or wear specifically where it contacts the drum, the drum grooves may be sharp, cracked, or worn. Good drums have smooth, rounded grooves that guide the cable without cutting into it.
5. Visible cracks or chips on the drum. Look up at the drums from inside the garage (with the door closed and opener disconnected). If you can see cracks, chips, or missing sections on the drum surface, it needs replacement before it breaks completely.
6. Door jerks or hesitates at specific points during travel. If the door moves smoothly through most of its travel but jerks, hesitates, or catches at one specific point, a damaged groove section on the drum may be causing the cable to bind at that point in its winding cycle.
7. One cable appears tighter than the other. With the door closed, both cables should have equal tension. If one cable is noticeably tighter or looser than the other, the drums may be different sizes, or one may have slipped on the torsion bar. This creates an unsafe imbalance.
8. The set screw is visible or protruding. Each drum is secured to the torsion bar with one or two set screws. If you can see a set screw that looks loose, backed out, or stripped, the drum can slip at any time, causing the cable to unwind suddenly.
Action Step
If you notice any of these signs, stop using the door immediately and call a professional. A failing cable drum can cause the cable to snap or unwind suddenly, which can damage the door, the opener, or anything in the door’s path. Call Advanced Door at (844) 971-3667 for same-day cable drum inspection.
Quick Diagnostic: Symptoms and Likely Causes
Use this table to match what you are seeing with the most likely cable drum issue. Remember that multiple problems can occur simultaneously, and cable drum issues often overlap with cable and spring problems.
| Symptom | Likely Cable Drum Cause | Other Possible Causes |
|---|---|---|
| Door tilts to one side during operation | Set screw slipped, drum shifted on bar | Broken spring (one side), snapped cable, bent track |
| Cable hanging loose beside door | Cable jumped out of drum grooves | Cable snapped, bottom bracket disconnected |
| Grinding noise from torsion bar area | Worn grooves, cable riding outside grooves | Worn bearing plates, dry torsion bar |
| Cable fraying near the top of the door | Cracked or sharp drum grooves cutting cable | Cable rubbing on track bracket, worn cable |
| Door jerks at specific point during travel | Damaged groove section, cable binding | Bent track, roller obstruction, travel limit |
| Unequal cable tension (one loose, one tight) | Mismatched drums, one drum slipped | Unequal spring tension (double spring system) |
| Door very heavy to lift manually | Wrong size drum (too small for door height) | Broken spring, worn spring, wrong spring size |
| Visible rust, corrosion, or cracking on drum | Corrosion from salt air or moisture exposure | Age-related deterioration (15+ years) |
| Cable wraps on top of itself (overlapping) | Wrong drum size, worn grooves, cable too thick | Wrong cable diameter for drum |
| Popping or snapping sound from above door | Set screw catching, drum slipping intermittently | Spring adjustment, bearing plate crack |
Pro Tip
Cable drum problems are often misdiagnosed as cable problems or spring problems because the symptoms overlap. An experienced technician will always check all three components together. If someone replaces your cable without inspecting the drum, the new cable may fail within months. Ask your technician specifically whether they inspected the drums and grooves.
7 Common Cable Drum Problems
Knowing the specific ways cable drums fail helps you communicate effectively with your technician and understand what needs to be done.
1. Set Screw Loosening
Each cable drum is secured to the torsion bar with one or two set screws (also called Allen screws or hex screws). Over thousands of cycles, vibration and thermal expansion can cause these screws to gradually loosen. Once a set screw loosens enough, the drum can slip on the bar, allowing one side of the door to drop or rise independently of the other.
Set screw loosening is more common in areas with large temperature swings. Utah’s 60 to 80 degree daily temperature variations (common in spring and fall) cause the steel torsion bar and the drum to expand and contract at slightly different rates, gradually working the screw loose.
2. Worn or Flattened Grooves
The grooves in a cable drum are designed with a specific profile that matches the cable diameter. Over years of use, the cable wearing against the groove walls flattens the groove profile. Once the groove is too flat to securely hold the cable, the cable can ride up out of the groove and overlap or jump off the drum entirely.
Groove wear accelerates when the cable is rough, frayed, or dirty. Gritty dust from construction sites, road debris, or desert sand that gets on the cable acts like sandpaper against the drum grooves.
3. Cracked or Chipped Drums
Cast zinc and aluminum drums can develop cracks over time, especially in cold temperatures. When temperatures drop below freezing (common throughout northern Utah from November through March), the drum material becomes more brittle. Repeated cycling in cold weather can cause stress fractures, particularly at the point where the set screw contacts the drum.
A cracked drum is dangerous because it can break apart under tension, causing the cable to release suddenly. If you see any visible cracks, even small ones, the drum needs immediate replacement.
4. Corrosion and Rust
While most cable drums have some corrosion resistance, prolonged exposure to moisture, road salt, and salt-laden air can cause significant deterioration. Corroded grooves become rough and abrasive, damaging the cable with each cycle. Corrosion on the bore (the center hole) can make the drum bind on the torsion bar.
For more on how corrosion affects all garage door components in Utah, see our complete rust and corrosion guide.
5. Wrong Size Drum Installed
One of the most common installation mistakes is using drums sized for the wrong door height. If a 7-foot drum is installed on an 8-foot door, the cable will run out of grooves before the door fully opens. This causes the cable to wrap on top of itself, creating a dangerous situation where the overlapping cable can slip or snap.
This error typically happens when a previous technician replaced drums without measuring the door height or when a homeowner orders drums online without understanding the sizing requirements. Our guide to spotting bad installations covers this and other installation errors.
6. Cable Wrapped Outside the Grooves
When a cable comes off the drum (from a spring break, cable snap, or manual disconnection) and is re-wound without being properly seated back into the grooves, it wraps irregularly. This creates uneven tension, noisy operation, and accelerated wear on both the cable and drum.
This problem sometimes occurs after a homeowner manually opens the door during a power outage and then reconnects the opener without ensuring the cables are properly seated. See our power outage recovery guide for proper reconnection procedures.
7. Bearing Bore Wear
The center hole of the cable drum (the bore) rides on the torsion bar. Over time, the bore can wear out or become oblong, causing the drum to wobble on the bar. This wobble makes the cable wind unevenly and creates a cyclic grinding noise. On the left drum (which is a stationary drum on most standard installations), bore wear also causes the drum to bind or seize.
Safety Warning
Never attempt to tighten a cable drum set screw while the springs are wound. The torsion bar is under extreme tension, and if the drum shifts suddenly, the cable can whip with enough force to cause serious injury. Even seemingly simple adjustments require the springs to be unwound first, which requires professional tools and training. Call (844) 971-3667 for safe cable drum service.
Cable Came Off the Drum: What to Do
“My garage door cable came off the drum” is one of the most common calls our technicians receive. Here is what you should know about this situation.
Why Cables Jump Off Drums
A cable comes off the drum for one of these reasons:
- A torsion spring broke. When a spring breaks, it releases all stored energy instantly. The sudden uncontrolled rotation of the bar can whip the cable off the drum on one or both sides. This is the most common cause.
- The drum’s set screw loosened. The drum slipped on the bar, and the cable lost its winding path.
- The bottom bracket detached. The cable’s attachment point at the bottom of the door came loose, releasing cable tension and allowing it to unwind off the drum.
- Worn drum grooves. The cable gradually rode out of deteriorated grooves until it jumped off completely.
- Someone manually lifted the door too fast. Yanking a door up quickly after disconnecting the opener can cause the cable to jump off if it is not seated perfectly in the grooves.
What to Do Right Now
Step 1: Do not attempt to operate the door with the opener. The opener does not know the cable is off and will try to move the door, potentially causing further damage or a dangerous situation.
Step 2: Do not try to re-wind the cable yourself. The cable must be properly seated into every groove on the drum, and the drum must be repositioned with the spring tension correctly set. This requires unwinding the torsion springs first.
Step 3: If the door is stuck in a partially open position, secure it with a C-clamp or locking pliers on the track above one of the bottom rollers to prevent it from falling. A door with a cable off is not properly supported and can drop without warning.
Step 4: Call a professional for same-day repair. At Advanced Door, cable-off-drum repairs are one of our most common service calls, and our technicians carry the most common drum sizes on their trucks. Call (844) 971-3667.
For complete instructions on manually securing and opening a door in an emergency, see our emergency manual operation guide. If the cable itself has broken, our snapped cable guide covers that situation in detail.
Action Step
When calling for service, tell the technician whether the cable came off one drum or both, whether you heard a loud bang before it happened (indicating a spring break), and whether the door is stuck open, closed, or partway. This helps the technician bring the right parts for a first-trip repair.
Professional Cable Drum Replacement Process
Understanding what a professional cable drum replacement involves helps you know what to expect and evaluate whether your technician is doing the job correctly.
A complete cable drum replacement typically takes 45 minutes to 1.5 hours and follows this process:
Step 1: Secure the door. The technician clamps the door to the tracks so it cannot move during the repair. This is a critical safety step.
Step 2: Release spring tension. Using winding bars, the technician carefully unwinds the torsion springs. This removes the torque from the torsion bar, making it safe to work on the drums. This is the most dangerous step and the primary reason cable drum work is not a DIY job.
Step 3: Remove the old drum. With the springs unwound, the technician loosens the set screw and slides the drum off the torsion bar. The cable is disconnected from the drum.
Step 4: Inspect the torsion bar. The technician checks the bar for wear grooves (created by the set screw), rust, bending, or diameter reduction at the drum location. A worn bar may need replacement or repositioning to provide a fresh surface for the new drum’s set screw.
Step 5: Inspect and replace cables if needed. Since the cables are already off, this is the ideal time to replace worn cables. A good technician will recommend replacing cables and drums together if both show wear, saving a future service call. See our cable repair guide for cable condition assessment.
Step 6: Install the new drum. The new drum is slid onto the torsion bar and positioned correctly. The cable is threaded through the drum’s cable slot and wound into the grooves. The set screw is tightened to spec.
Step 7: Re-wind the springs. The technician winds the torsion springs back to the correct number of turns for your door’s weight. This restores the counterbalance system. See our torsion spring replacement guide for details on proper winding.
Step 8: Test and adjust. The door is tested through multiple full cycles. The technician checks for even lifting, proper cable tension on both sides, smooth winding into the drum grooves, and correct door balance.
Pro Tip
Ask your technician whether they replaced one drum or both. While it is sometimes acceptable to replace only the failed drum, if both drums have similar wear or age, replacing both at the same time is more cost-effective than paying for a second service call in a few months. The parts cost for a second drum is minimal compared to the labor of unwinding springs again.
Cable Drum Repair and Replacement Costs
Cable drum repair costs depend on the type of service needed, the drum configuration, and whether other components need attention at the same time. These are typical industry price ranges for the Utah market.
| Service | Typical Cost Range | Notes |
|---|---|---|
| Set screw tightening only | $75 – $150 | Requires spring unwinding, so labor is significant even for a minor fix |
| Cable re-wound on drum | $100 – $200 | If drum and cable are both in good condition |
| Single drum replacement | $150 – $275 | Parts ($20 – $50) plus labor |
| Both drums replaced (pair) | $200 – $350 | Recommended when both show wear |
| Drum + cable replacement (one side) | $175 – $325 | Most common service combination |
| Both drums + both cables | $250 – $450 | Best value when both sides need attention |
| Drums + cables + springs (full overhaul) | $350 – $700+ | Common when system is 15+ years old |
| High lift or commercial drum replacement | $300 – $600+ | Specialty parts, extended labor |
These ranges include parts and labor for the Utah market. Actual costs depend on door size, drum type, accessibility, and whether additional components need attention. Call (844) 971-3667 for a free estimate specific to your situation.
Pro Tip
If your technician is already unwinding the springs for any reason (spring replacement, cable replacement, or any torsion bar work), ask about replacing the drums at the same time. The incremental cost for drums during an existing spring job is much less than a standalone drum replacement because the most expensive part of the labor (spring unwinding and re-winding) is already being done. For a full breakdown of spring service costs, see our spring replacement cost guide.
Repair vs. Replace: Making the Right Call
Not every cable drum issue requires replacement. Here is how to determine whether repair or replacement is the right approach.
When Repair Is Sufficient
- Set screw just needs tightening: If the grooves are still in good condition and the drum has not cracked, a set screw tightening (with Loctite) may be all that is needed
- Cable just needs re-winding: If the cable jumped off the drum but both components are undamaged, re-winding is appropriate
- Minor surface corrosion: Light surface rust that has not affected groove integrity can be cleaned and treated
When Replacement Is Necessary
- Cracked or chipped drum: Any structural damage means immediate replacement. Cracks only get worse under the cyclic stress of daily use
- Worn or flattened grooves: Once grooves lose their profile, no repair can restore them. The drum must be replaced
- Significant corrosion: If corrosion has pitted the grooves, roughened the bore, or weakened the material, replace the drum
- Wrong size drum: If someone installed the wrong drum for your door height, it must be replaced with the correct size
- Bore is worn or oblong: A drum that wobbles on the torsion bar because the center hole is worn cannot be repaired
- Drum is 15+ years old: Even if it looks OK, the material may have micro-fatigue. During a spring replacement, swapping old drums is cheap insurance
As with all garage door components, the best time to replace drums is during related service work. If you are already paying for a spring replacement, the additional cost for new drums is minimal because the labor-intensive spring unwinding is already included. For a complete overview of how repair vs. replacement decisions work for your entire garage door system, see our repair vs. replacement decision guide.
DIY vs. Professional: Why Cable Drums Need a Pro
Cable drum work is one of the few garage door repairs that is genuinely unsafe for homeowners to attempt. Here is why.
Why This Is Not a DIY Job
Torsion spring danger. To access the drums, the torsion springs must be fully unwound. Unwinding torsion springs requires specialized winding bars and extensive training. A spring that slips during unwinding can break a hand, arm, or worse. This is not an exaggeration. Emergency rooms see torsion spring injuries regularly.
Precision requirements. The drum must be positioned on the bar so that the cable winds exactly into the grooves with zero overlap. The set screw must be tightened to the correct torque. The cable must enter the drum at the correct angle. Even small errors cause the cable to jump off, creating a dangerous situation.
System calibration. After drum replacement, the springs must be re-wound to the exact number of turns for your door’s weight. Too few turns and the door is heavy and the opener strains. Too many turns and the door flies up on its own. This calibration requires knowing the door’s weight, the spring specifications, and the correct winding formula.
Matching components. Both drums must be the same size, oriented correctly (left and right drums are different), and matched to the cable diameter. Installing a left drum on the right side, for example, causes the cable to wind in the wrong direction.
What You CAN Safely Do
- Visual inspection. You can safely look up at the drums from inside the garage (with the door closed) to check for visible cracks, corrosion, or loose set screws. Use a flashlight
- Listen for symptoms. Note any grinding, popping, or scraping sounds from the torsion bar area and report them to your technician
- Check cable tension. With the door closed, gently pluck each cable (like a guitar string). Both should feel approximately the same tension. One being noticeably looser indicates a potential drum issue
- Check for cable fraying. Look for broken strands or fraying where the cable contacts the drum
- Keep the area lubricated. During routine maintenance, you can apply a light spray of garage door lubricant to the torsion bar where the drums ride (only with the door closed and not operating)
For a complete list of safe DIY maintenance tasks, see our maintenance schedule guide. For understanding which repairs are safe to do yourself and which require a professional, our Utah repair guide breaks down every common repair by difficulty and risk level.
Safety Warning
Online videos showing “easy” cable drum replacement almost always skip or downplay the spring unwinding step. Do not be misled. The springs on a standard two-car garage door store enough energy to cause severe injury or death. Professional technicians use specialized tools and follow strict safety protocols developed over decades. This is one repair where the cost of professional service is a fraction of the potential cost of a hospital visit.
How Utah’s Climate Affects Cable Drums
Utah’s diverse and often extreme climate creates specific challenges for cable drums that homeowners in milder states do not face.
Temperature Extremes and Thermal Cycling
Utah experiences some of the largest daily temperature swings in the country. A summer day in St. George can range from 75 degrees at dawn to 110 degrees by afternoon. In Logan, winter temperatures can swing from 10 degrees at night to 40 degrees during the day. These swings cause repeated thermal expansion and contraction of the torsion bar and drums.
Because the steel torsion bar and cast zinc drums expand at different rates, the set screw connection is stressed with every temperature cycle. Over months and years, this differential expansion works set screws loose, which is why set screw failures are more common in Utah than in states with more moderate climates.
Road Salt and De-Icing Chemical Corrosion
UDOT applies millions of tons of road salt and de-icing chemicals to Utah roads every winter. Vehicles track this material into garages, where it becomes airborne as dust and settles on garage door components. Cable drums, particularly those made of cast zinc or aluminum, are vulnerable to chloride-accelerated corrosion.
The Wasatch Front from Ogden to Provo is especially affected because of the high concentration of salted highways and the inversion conditions that trap corrosive particulates in the air for days at a time. For a deep dive on salt corrosion across Utah, see our rust prevention guide.
Great Salt Lake Aerosol Corrosion
Communities near the Great Salt Lake face a unique corrosion risk. Wind picks up salt from the exposed lakebed (increasingly large due to declining lake levels) and deposits microscopic salt crystals on surfaces miles inland. This salt aerosol attacks metal components continuously, not just during winter.
Homes in Tooele, Magna, West Valley City, Roy, Layton, and Bountiful are most affected. Cable drums in these areas may show corrosion damage 5 to 8 years earlier than drums in areas further from the lake. If you live in this zone, request corrosion-resistant drums during any service work. See our city-specific guides for Tooele County, West Valley City, and Davis County for more on local corrosion challenges.
Dust and Particulate Contamination
Utah’s arid climate produces significant dust, especially during summer construction season and in southern Utah’s desert environments. Dust that settles on cables and drum grooves acts as an abrasive, accelerating wear. In construction-heavy areas like Lehi, Eagle Mountain, and Saratoga Springs, where new housing developments create persistent dust clouds, cable and drum wear can accelerate noticeably.
Cold Weather Material Brittleness
Cast zinc and aluminum drums become more brittle at low temperatures. In Cache Valley (Logan, Smithfield, Hyrum), Bear Lake, and mountain communities (Park City, Heber City, Brian Head), where temperatures regularly drop below zero, drums are at higher risk of cracking. This is compounded by the fact that doors in these areas tend to be heavier (more insulation) and operate under higher spring tension, putting more stress on cold drums.
Elevation Effects
Utah’s higher elevation means lower air density, which has no direct effect on drums but does affect the lubricants used on the torsion bar. Thinner lubricant films at altitude provide less protection against metal-to-metal contact between the drum bore and the bar, accelerating bore wear. Use lubricants rated for the temperature extremes in your specific area. Our lubrication guide covers the best products for Utah conditions.
Utah Note
If you are replacing torsion springs and your door is more than 10 years old, ask your technician to inspect the cable drums and replace them if there is any sign of wear, corrosion, or groove degradation. The parts cost for drums is minimal ($20 to $50 per drum) compared to the labor cost of a separate service call later. This is especially important if you live in a high-corrosion zone near the Great Salt Lake or along the Wasatch Front I-15 corridor.
Cable Drum Maintenance and Prevention
While cable drums do not require the same regular maintenance as springs or rollers, some simple steps can extend their lifespan significantly.
Monthly Visual Inspection (Safe DIY)
Once a month, with the door closed and the opener disconnected, look up at the drums from inside the garage:
- Check for visible cracks, chips, or corrosion on the drum surface
- Look for cable strands that appear frayed or broken near the drum
- Check that the cable is sitting neatly in the grooves (no overlapping or riding up)
- Look for any set screws that appear backed out or loose (do NOT attempt to tighten them)
- Check that both cables have similar tension (gently pluck each one)
Annual Professional Inspection
During your annual garage door tune-up, ask your technician to specifically check:
- Set screw torque on both drums
- Groove condition and depth
- Bore wear and drum stability on the bar
- Cable condition where it contacts the drum
- Torsion bar condition at drum mounting points
These checks take a trained technician only a few minutes and can catch problems months before they cause a failure. Schedule your tune-up as part of our recommended maintenance schedule.
Lubrication
The torsion bar where the drums ride benefits from a light application of garage door lubricant during your biannual lubrication routine. This reduces friction between the drum bore and the bar, prevents corrosion, and helps the system operate smoothly. Use a silicone-based or lithium-based garage door lubricant, never WD-40 (which is a solvent, not a lubricant). Our complete lubrication guide covers the best products and techniques.
Keep the Garage Clean
Dust, road salt residue, and debris that accumulate in the garage eventually settle on cables and drum grooves. Regular sweeping and occasional hosing down of the garage floor reduces the amount of abrasive material that reaches your door’s mechanical components. This is especially important during Utah’s construction season and after winter salt applications. See our cleaning guide for thorough maintenance routines.
Rinse Cables After Winter
In spring (April or May), use a damp cloth to wipe down the cables from the bottom brackets up to as high as you can safely reach. This removes accumulated road salt and de-icing chemicals before they can migrate up to the drum grooves. Follow with a light spray of lubricant on the cables. This simple 10-minute task can add years to the life of both your cables and drums.
7 Common Mistakes Homeowners Make With Cable Drums
1. Ignoring a crooked door. “It still works” is the most common response to a door that is slightly tilted during operation. But a crooked door means one cable is carrying more weight than the other, accelerating wear on the overloaded cable, drum, and track on that side. What starts as a minor drum issue becomes a multi-component failure. See our crooked door guide for all possible causes.
2. Trying to tighten the set screw themselves. “It’s just a screw” reasoning leads homeowners to grab an Allen wrench and attempt to tighten a loose drum set screw. This is extremely dangerous because the torsion bar is under hundreds of foot-pounds of torque. If the drum shifts during your adjustment, the bar can rotate and whip the cable or winding cone with devastating force.
3. Replacing cables without inspecting drums. When a cable breaks or frays, the natural instinct is to replace the cable. But if the drum’s grooves are worn and caused the cable damage, the new cable will fail the same way. Always insist that your technician inspect the drums during any cable work.
4. Ordering drums online without proper sizing. Cable drums look similar but come in multiple sizes based on door height. Online sellers often list drums generically, and a 7-foot drum installed on an 8-foot door (or vice versa) creates serious problems. Door height determines drum size, not door width or weight.
5. Continuing to use the door after a cable jumps off. Some homeowners manually push the cable back toward the drum and try to operate the door, hoping it will re-seat itself. It will not. The cable must be properly wound into every groove with the springs unwound first. Operating the door with a loose cable causes it to tangle, kink, and potentially snap.
6. Not replacing drums during spring replacement. Springs and drums have similar lifespans (10 to 15 years). When your springs are being replaced, the technician has already unwound the old springs, which means the drums are accessible at no additional labor cost. Skipping drum replacement to save $30 to $50 on parts often means paying full labor again a year or two later when the old drums fail.
7. Assuming both drums are the same. Left and right cable drums are mirror images of each other. The grooves spiral in opposite directions to accommodate the cable winding from opposite sides of the door. Installing a left drum on the right side (or vice versa) causes the cable to wind in the wrong direction, creating a dangerous situation.
Frequently Asked Questions
How long do garage door cable drums last?
Cable drums typically last 10 to 20 years depending on usage, climate exposure, and material quality. In Utah’s high-corrosion areas near the Great Salt Lake or along heavily salted highways, drums may last 8 to 12 years. In drier, less corrosive areas like St. George or Cedar City, they can last 15 to 20 years. Regular lubrication and keeping the garage clean extends drum life significantly.
Can I replace just one cable drum or do I need to replace both?
You can replace just one if the other is in good condition. However, if both drums are the same age and the failed drum shows wear-related damage (rather than a defect or impact), the other drum likely has similar wear. Replacing both during the same service call saves money because the labor-intensive spring unwinding is done only once.
How do I know what size cable drum I need?
Cable drum size is determined by your door’s height. A professional technician measures the door and selects the correct drum. Do not attempt to determine this yourself and order parts online, as even a quarter-inch error in drum diameter changes the mechanical advantage and can cause improper door balance and cable problems.
Why does my cable keep coming off the drum?
Recurring cable-off-drum problems usually indicate one of three issues: worn drum grooves that can no longer hold the cable securely, a set screw that keeps loosening (the bar may have a wear groove at the set screw point), or the wrong size drum for your door height. If it has happened more than once, the drum almost certainly needs replacement, not just a cable re-wind.
Can cable drum problems damage my garage door opener?
Yes. When a drum fails and causes uneven lifting, the opener motor strains to move a door that is binding in the tracks. This can burn out the motor, strip the opener’s gears, or damage the trolley mechanism. A $200 drum replacement can prevent a $400 or more opener repair. For opener troubleshooting, see our brand-specific guides for LiftMaster, Genie, Chamberlain, Craftsman, and Linear.
Are cable drums covered under warranty?
Manufacturer warranties on cable drums vary. Some door manufacturers include drums in the hardware warranty (typically 1 to 3 years), while others do not cover them at all. At Advanced Door, our lifetime warranty on parts and labor covers cable drums replaced during our service. For detailed warranty information, see our warranty guide.
What is the difference between a cable drum and a cable pulley?
Cable drums are part of torsion spring systems. They mount on the torsion bar above the door and have grooves that the cable winds into. Cable pulleys are part of extension spring systems. They mount at the back of the horizontal tracks and guide the cable around a smooth wheel. Drums wind cable, pulleys redirect it. See our torsion vs. extension spring guide to identify which system your door uses.
Should I upgrade my cable drums when I upgrade my springs?
Yes, this is the ideal time. Since spring replacement requires unwinding the old springs and removing them from the torsion bar, the drums are fully accessible with no additional labor. If your drums are more than 10 years old or show any signs of wear, groove deterioration, or corrosion, upgrading them during a spring replacement costs only the price of the parts ($20 to $50 per drum) rather than a full service call ($150 to $275) later. See our spring replacement cost guide for complete pricing information.
Get a Free Estimate from Advanced Door
Cable drum problems? Crooked door? Cable off the drum? Our technicians diagnose and fix cable drum issues the same day.
Serving Ogden, Salt Lake City, Provo, Park City, Logan, and all of Utah
Call for a free estimate. No pressure, no hidden fees.
Current offers: $100 off any new door or 10% off any service call
(Offers cannot be combined)